
How to make sourdough bread that turns out perfect every time. This step by step recipe is very forgiving and always turns out beautiful!

You will never regret learning to make sourdough. While it takes a bit of patience, the health benefits and delicious taste are enough to keep you trying. This step by step recipe of how to make sourdough bread is very forgiving.
Health Benefits of sourdough:
I got started making sourdough after learning I had a gluten intolerance. Something that we are seeing more and more of in the USA. I missed eating delicious bread and learned that my body could tolerate sourdough due to its easier to digest properties. Because of the long fermented process, the gluten and phytic acid are broken down and this makes it much more gut healthy. You can read more about it here.
What you will need to get started:
Large mixing bowl
A tool to mix your ingredients; such as a dough hook, wood mixing spoon, or a regular mixing spoon
Dish towel
A food scale is best for precision, however this recipe can be made with the use of measuring cups and spoons
Banneton basket, or you can also use a towel lined mixing bowl
Dutch oven
Parchment paper
Bread lame for scoring, or a sharp knife
Flour
Warm Water
Active, bubbly sourdough starter
Salt
About the sourdough starter: The key is to make sure it is bubbly and active
Where can you get a starter? You can buy them online through various websites, etsy, and even eBay! You can make your own following online recipes or YouTube tutorials, or you can ask around your community and see if someone would be willing to share theirs with you. It only takes a very small amount to get one going.
I keep my starter in the refrigerator for the most part. When I know I am going to be making bread, I pull it out and feed it the night before. After 12 to 15 hours, I check to make sure it has doubled in size and that it is bubbly.
The temperature of your kitchen will determine the amount of time it takes for it to double and be ready, so it might take some trial and error as to how many hours to weight. I usually find that when I feed it the night before, mine is good and ready by mid morning. Averaging about 15 hours.
Here she is in all her bubbled up goodness:

How to make sourdough bread. Here is the step by step recipe:
Now that your starter is bubbly and ready to use, it’s time to make sourdough bread!
Begin by measuring out 375 grams (1 1/2 cups) of warm water in your bowl.

Next, pour in 100 grams (1/2 cup) bubbly starter.

Now mix the starter and water together really well.

Once mixed, add 10 grams (2 tsp) salt and mix throughly.
Finally, mix in 500 grams (4 cups) all purpose flour.

At this point, the dough will be very sticky. That is normal.

Now, place a damp dish towel over the top of your bowl. Make sure it is completely covered. Let the dough rest for 30 minutes. In 30 minutes you will uncover and perform your first set of stretch and folds.
A stretch and fold is exactly what it sounds like. Gently grab one end of your dough with both hands and stretch it, then lay it back down over the top of itself. Turn the bowl and stretch the other side until all 4 sides of the dough have been stretched and folded.
Here is a look at mine after the first set of folds. Notice how smooth the dough is already becoming as the gluten starts to develop.

Next, cover your dough with the damp towel and let it rest again for another 30 minutes. You will repeat this process until the dough has been stretched and folded 4 times total.
Here is a look at the dough after the 4th stretch and fold. It is nice and glossy and not sticky.

From here, cover back up with your damp towel and let the dough sit from 4 to 8 hours.
This is where it gets a little tricky because the rise of your bread will all depend on the temperature of your house. On this day, my kitchen was pretty warm (about 78 degrees), so the dough is going to rise much quicker than in the winter time when it is colder inside.
It is best to let the dough get a slight rise, but not completely double in size before shaping.
Below is a picture of it after sitting for 3 hours. Not even close to doubling, so I covered back up and let it sit longer. It is starting to bubble up around the edges. This is a good sign.

Here it is after 4.5 hours. Again, my kitchen was very warm so I knew that it was going to be a quicker rise.
You can see it is looking nice and bubbly, and risen at about 1/3 of its size. From here, it is ready to laminate and place in the banneton basket.

Building tension to develop the gluten in your dough:
Lamination is a bread dough folding technique that builds strength in the dough. To laminate your dough, you will take it out of the bowl and form it into a rectangle on your countertop.

Start by grabbing at the long end of your rectangle and folding it in half. Grab the other end of your dough and fold it into the middle as well. It should look like this:

Next, you will grab the dough from one end and roll it into a ball.

Now you will want to build a little more tension in the dough for the final shaping.
This is achieved by pushing the ball of dough away from you on the countertop and gently pulling it toward you in a forward and back motion. Repeat the forward and back motion 5 or 6 times.
It is time to place the dough top side down on a floured lined bowl or basket.

Place in the floured basket and cover with a plastic grocery bag.

Place your covered dough in the refrigerator for 12 to 24 hours. I have even forgotten about mine for 3 days and it still baked up beautifully.
Time to bake
When you are ready to bake, pre-heat a cast-iron dutch oven in a 500 degree oven.
Once your oven reaches 500, remove the dough from the refrigerator and place right side up on a piece of parchment paper.
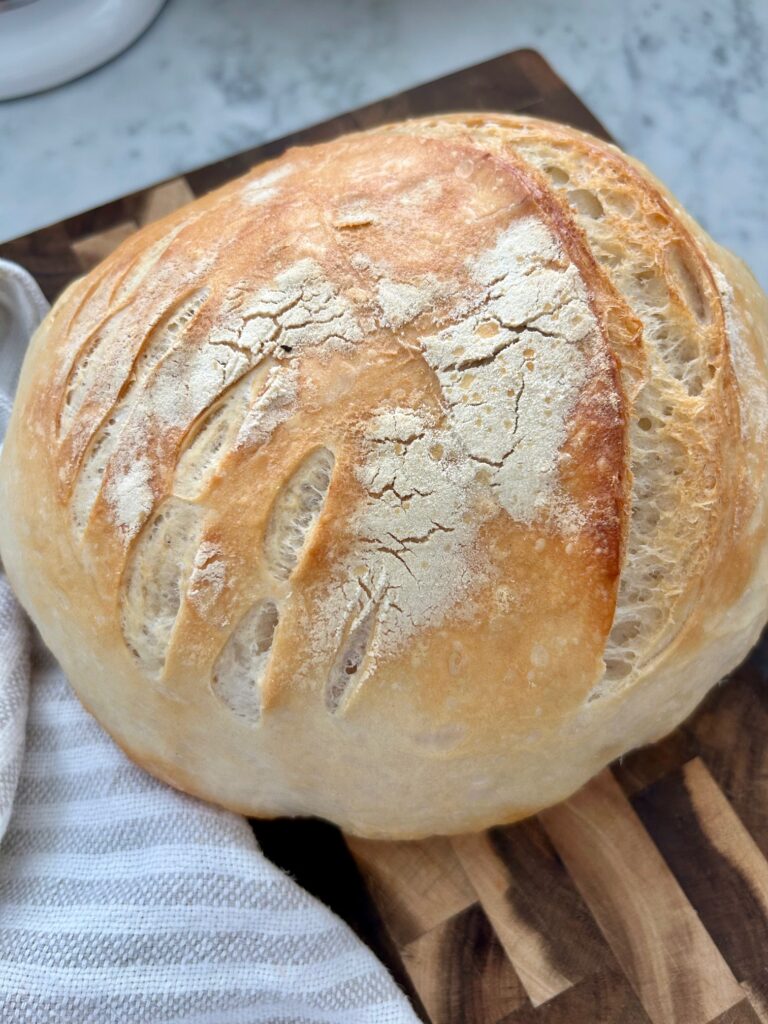
Score the top with any design of your choosing. Basically, by scoring the dough you are allowing any steam to be released while baking. It also makes it look beautiful when it’s all baked.

To Bake:
Carefully transfer your dough into the pre-heated dutch oven, parchment paper and all. Turn your oven heat down to 450 degrees and bake with the lid on for 30 minutes.
After 30 minutes, remove the lid from your dutch oven.
Lower the temperature of your oven to 425 degrees and bake for another 15 minutes.
Let bread cool on a cutting board for at least one hour so bread can hold its shape.
Enjoy!

How to Make Parmesan Cheese Sourdough Bread
Equipment
- Mixing bowl
- Dough hook
- Dish towel
- Dutch Oven
- Parchment paper
- Food Scale optional
- Measuring cups and spoons
- Banneton Basket optional
Ingredients
- 375 grams Water
- 100 grams Active and bubbly sourdough starter
- 10 grams salt
- 500 grams All purpose flour
- 1.5 cups Parmesan Cheese
Instructions
- In a large mixing bowl, measure out 375 grams of warm water and mix in 100 grams of active, bubbly sourdough starter.
- Incorporate 10 grams of salt.
- Mix in 500 grams of all purpose flour.
- Dough will be very sticky. Cover with a damp dish towel and let it rest for 30 minutes.
- After 30 minutes, perform your first set of stretch and folds. Continue to stretch and fold dough every 30 minutes until you have completed 4 sets.
- By now, your dough should be nice and easy to handle and not sticky. Cover back up with wet dish towel and let it sit for up to 8 hours. At this point you will want to keep an eye on it. Depending on how warm it is in its environment, that will determine how quick it rises. You will want to remove from the bowl when it gets about 1/3 larger. Not quite doubled in size.
- Next, carefully stretch the dough on your countertop into a rectangle shape and sprinkle parmesan cheese all over the top. Laminate it by folding long sides into the center and rolling form the ends into a ball.
- Continue to build tension in the dough by gently pushing it away and pulling it towards you 5 or 6 times.
- Add dough to a floured banneton, or a basket or bowl liked with a towel. Wrap with a plastic grocery bag and place in the refrigerator for 12 hours, or up to 2 days.
- You want the bread to be cold when it goes into the oven. This makes it puff up better and easier to score.
- Pre heat a cast-iron dutch oven to 500 degrees.
- Place your dough onto a piece of parchment paper and score the top with any design you like.
- Put your dough into your hot cast iron dutch oven and place back into the oven at 450 degrees for 30 minutes.
- After 30 minutes, remove the lid and lower oven temperature to 425 degrees. Bake for 15 more minutes.
- Remove bread from the oven and place on a cutting board. Let it sit and cool for at least an hour. It is important to let the bread cool so that it holds its shape.
- Enjoy!
Products used:


So good!!!! Thank you!!!
Love it!! Thank you
Informative, concise, and well-structured. Keep up the excellent work!